
Intro
“BDD is about driving quality into our designs while retaining the flexibility to adapt as we learn more. It encourages us to stop thinking about how our software WORKS and start thinking about the things that our software DOES.” – Dave Farley
As developers, we pride ourselves on clean code, solid architecture, and adherence to best practices. We debate linting rules, obsess over unit test coverage, and implement the latest frameworks. These are all essential aspects of building reliable software. However, there’s one critical element that often ends up as an afterthought: acceptance testing.
Acceptance testing isn’t just a final sign-off activity. It’s a validation that the software we built actually fulfils the intended business goals. Yet, too often, it’s left until the end of the cycle — or even worse, it becomes a formality. When this happens, feedback loops get longer, bugs are costlier to fix, and we risk delivering software that “works” but doesn’t actually work for the user.
The reality is that acceptance testing should begin long before the software is ready to deploy. It should be embedded into the way we think, plan, and write code. That’s where techniques like Behaviour-Driven Development (BDD) shine — they help define acceptance criteria in clear, executable language, and bridges the SCRUM team and business stakeholders from the start.

In this blog post (1 of 2), we will be exploring how a Quality Assurance Engineer can lead the software outcome with Acceptance Tests using Behaviour Driven Development.
We will explore BDD Testing techniques in a Java setup, with actual development, whilst taking a deep dive into the development flow to write fast and efficient tests.
Context
Before diving into the BDD Test Code, lets put some context in place, and explore a typical SCRUM team. During code explanation, we will be making constant reference to the SCRUM team members and ceremonies, as well as the application under test – a simple booking restful API.
The application under test can be found here, whilst the BDD acceptance tests against it can be found here.
The SCRUM Team
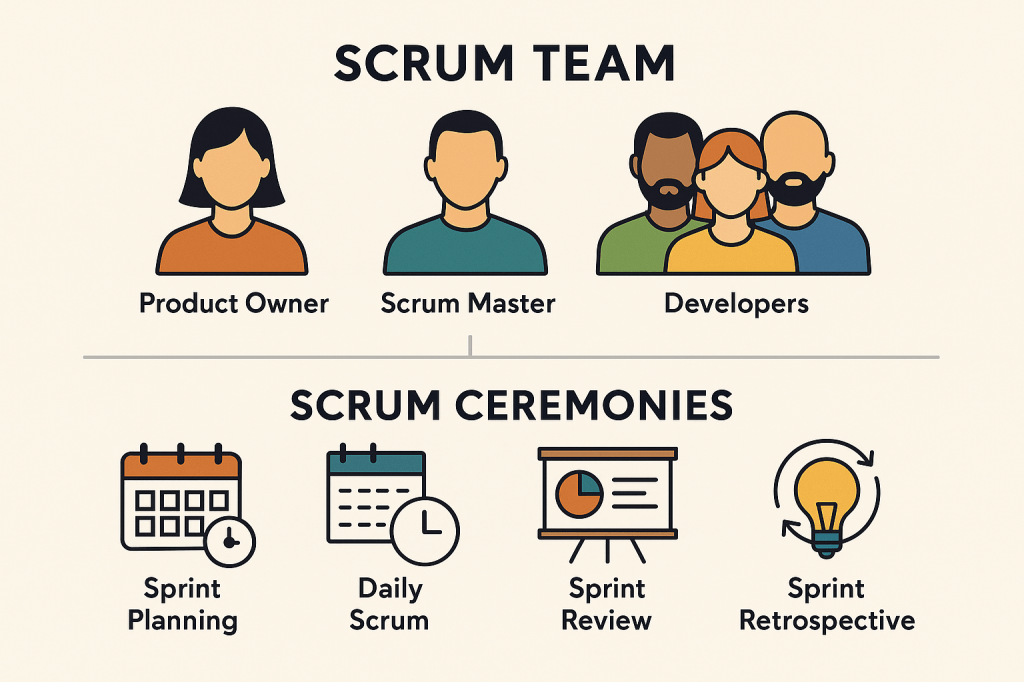
A Scrum Team is designed to be cross-functional and self-managing, which means it has all the skills needed to deliver a product increment and makes its own decisions on how to do the work. Below are the roles and responsibilities of every SCRUM Team member.
| Role | Responsibilities |
|---|---|
| Product Owner (PO) | – Owns the product backlog – Defines and prioritizes features based on value – Represents stakeholders and business goals |
| Scrum Master (Usually, one of the Developers) | – Facilitates the Scrum process – Coaches the team on Agile principles – Removes impediments – Shields the team from distractions |
| Developers (includes Quality Assurance Engineers, Business Analysts and UX/UI Designers) | – Build the product increment – Own sprint commitments – Collaborate on planning, design, and testing – Estimate and break down work |
The SCRUM Team dynamics – responsibilities into practice.
The PO is constantly aligning the team with business values.
The Scrum Master ensures the team follows Scrum principles and stays unblocked.
The Developers self-organize around tasks, collaborate closely, and own delivery.
The team has a shared responsibility for quality, planning, and improvement.
Ceremonies
Each ceremony supports transparency, inspection, and adaptation — the pillars of Scrum. Below are the typical set of ceremonies (meetings) used in a SCRUM setup, to support the dynamics above
1. Sprint Planning
- When: At the beginning of the sprint (usually every 2 weeks)
- Who: Scrum team
- Purpose: Decide what can be delivered in the sprint and how to achieve it.
- Outcome: A committed set of features.
2. Daily Scrum (Stand-up)
- When: Every day (usually 15 minutes)
- Who: Developers
- Purpose: Synchronize the team, identify blockers
- Questions:
- What did I do yesterday?
- What will I do today?
- Are there any blockers?
3. Sprint Review
- When: End of the sprint
- Who: Scrum team + stakeholders
- Purpose: Review the increment, gather feedback, inspect and adapt the product
- Outcome: Shared understanding of progress and future direction
4. Sprint Retrospective
- When: After the Sprint Review, before the next Sprint Planning
- Who: Scrum team
- Purpose: Reflect on the process and team dynamics
- Outcome: Action items to improve the next sprint
5. Backlog Refinement (Not an official ceremony but widely used)
- When: Ongoing, or set meetings during the sprint
- Who: Scrum team
- Purpose: Clarify, estimate, and break down backlog items
- Outcome: Ready stories for future sprints
The Application Under Test
The application under test is a Java-based RESTful API application developed using the Spring Boot framework. Its primary function is to manage bookings—though the specific type of bookings is left to the user’s interpretation.
Key Features:
- CRUD Operations: The application supports Create, Read, Update, and Delete operations for booking entities.
- H2 In-Memory Database: Utilizes H2, an in-memory database, for data storage, facilitating rapid development and testing without the need for external database configurations.
- Spring Data JPA Integration: Employs Java Persistence API (JPA) for seamless interaction with the database, simplifying data access and manipulation.
- Spring MVC Framework: Leverages Spring MVC to expose RESTful endpoints, enabling interaction over HTTP.
- HATEOAS Support: Incorporates Hypermedia as the Engine of Application State (HATEOAS) principles to enhance API navigation and discoverability.
- Swagger UI Integration: Provides a Swagger-based interface for API documentation and testing, locally accessible at
http://localhost:8080/swagger-ui/index.htmlupon running the application.
Run the below post cloning to execute the Application under test:
mvn clean spring-boot:runAcceptance Tests
One of the biggest misconceptions in the QA realm is that Acceptance testing is just about the front end. Well, it is not! It’s a broader concept that applies to the entire system and is meant to validate that the software meets business requirements and user expectations, regardless of whether it has a front-end interface or not.
While it’s common to associate acceptance tests with UI automation (e.g., Playwright, Selenium, Cypress etc), acceptance testing applies to any kind of interface. Below are some characteristics of an Acceptance Test.
| Characteristic | Description |
|---|---|
| Focused on outcomes | Does the feature meet business/user needs? |
| Crosses multiple layers | Can involve UI, API, DB, etc. |
| Written in business terms | Often readable by non-technical stakeholders (BDD) |
| Often automated, but not always | Can be manual too, especially during UAT |
The Acceptance Test samples prepared against the Booking App can be found here. Although cloning the repository is not necessary, we suggest you do so. Once cloned and all dependencies are resolved, run the below mvn command to execute locally:
mvn testAlternatively, start a java project from scratch using your favourite IDE, prepare the necessary maven dependencies found in this pom.xml file, and run mvn install in your terminal.
Java Package Structure
The acceptance test codebase is fairly straightforward, and it doesn’t need to be complex. However, it’s crucial to keep scalability in mind at all times by maintaining a clear separation of concerns between Java files. The initial folder structure will influence where future Java files are placed, so it’s important to get this right from the beginning.
src/main/java
io.qualitymatters.bdd.booking.actions: Contains reusable actions for interacting with the booking API.io.qualitymatters.bdd.booking.pojo: Includes POJOs (Plain Old Java Objects) that represent the data models.io.qualitymatters.bdd.utilities: Utility classes to support test execution.
src/test/java
- Step Definitions: Java methods that are mapped to Gherkin steps to execute the tests.
src/test/resources/booking
Booking.feature: The Gherkin feature file defining all test scenarios for the booking functionality.
The Feature File
The Feature file is the file holding the Acceptance Tests. Acceptance Tests are referenced as Scenarios in the feature file. In a nutshell;
- Feature File is equivalent to an Acceptance Test Suite
- Scenarios are equivalent to Acceptance Tests
- A Feature file can hold one ore more Acceptance Tests.
Behaviour Driven Development is the practice, whilst Gherkin is a domain-specific language (DSL) used to write the scenarios in BDD. It’s what you use to describe the behaviour of the system in a format that’s easy to read and understand. Let’s explore the Scenarios – aka. The Acceptance Tests.
@booking
Feature: Booking

  Background:
    Given a bookings list is available

  @functional
  Scenario: GET Booking list
    When the user retrieves booking list
    Then the user should have a list of all bookings

  @functional
  Scenario: GET Booking by id
    When the user retrieves booking id 3
    Then the user should have booking id 3

  @functional
  Scenario: Update Booking by id
    When the user updates booking id 4
    Then the user should have an updated booking id 4

  @functional
  Scenario: Update Booking by id
    When the user updates booking with the following
    |id|firstName|lastName|
    |5 |Jimmy    |Page    |
    Then the user should have an updated booking

  @functional
  Scenario: Add Booking
    When the user adds a new booking
    Then the user should have an updated booking list

  @functional
  Scenario Outline: Add Multiple bookings
    When the user adds booking with '<firstName>' and '<lastName>'
    Then the user should have an updated booking list

    Examples:
    |firstName|lastName|
    |Robert   |Plant   |
    |John Paul|Jones   |
    |John     |Bonham  |
    |Peter    |Grant   |

  @functional
  Scenario: Delete Booking by id
    When the user deletes booking by id 5
    Then the user should not have booking id 5

  @performance
  Scenario: Measure Booking Response Time
    When the user retrieves booking list
    And the response time is captured
    Then the user should have that booking list in less than 15 ms
Let’s take a deep dive and explore the Gherkin Language in more details.
🏷️ Tags
@booking,@functional,@performance: Group scenarios for selective test execution.- Useful for selective regression tests.
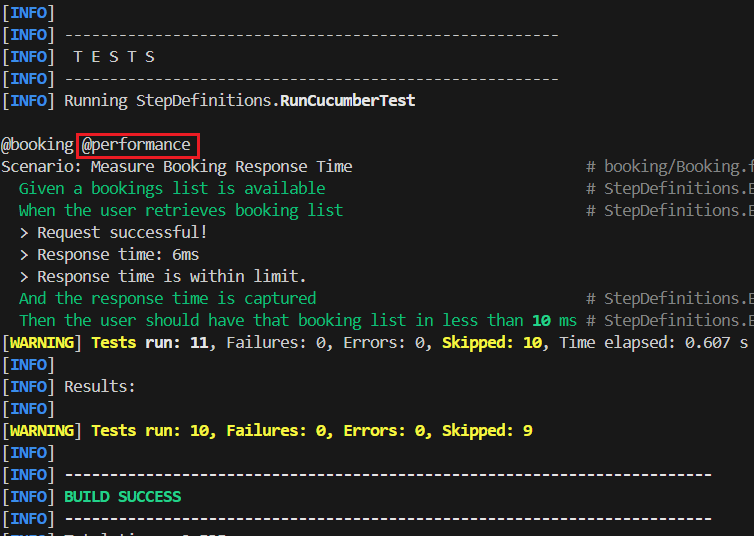
- Tags are specified in RunCucumberTests.java file (Line 17). Notice the below execution, where only the Acceptance Test with tag
@performancewas triggered (@bookingwill always be triggered since it’s the Parent Tag.@functional,@performanceare child tags).
🧾 Feature & Background
Feature: Booking: Describes the feature being tested.Background: Common setup for all scenarios .- Executes with every scenario within the feature file. Notice the below execution, where the Given step –
Given a bookings list is available, is executed at the beginning of every test.
- Executes with every scenario within the feature file. Notice the below execution, where the Given step –

✅ Scenarios
Each Scenario: defines one specific Acceptance Tests you’re testing. Let’s walk through the first test – GET Booking List:
@functional
Scenario: GET Booking list
  When the user retrieves booking list
  Then the user should have a list of all bookings
The above acceptance test can ensures that whenever the booking list is called, the user should have a bookings list (JSON in this case).
In a nutshell:
- Tests the GET /bookings endpoint.
- When is the action.
- Then is the expected result. (booking list available as POJOs)
The Step Definitions
A step definition file contains the actual code that tells Cucumber (the Gherkin tool) how to perform the steps written in the Feature file. Think of it as the “glue” between your Acceptance Test and your automation code.
Each method is annotated with @Given, @When, or @Then, followed by a regex-like string that matches a line in the .feature file.
When Cucumber runs the feature file, it looks for a matching method and executes it.
You can use parameters to capture dynamic values from steps (like names, numbers, etc.).
As highlighted earlier on, it is of utmost importance to place the step definition file in the src/test/java under a proper package like stepdefinitions, or something meaningful to your domain.
Empty Step Definitions
At the beginning of this blog, we referred to the QA Engineer as the developer in the SCRUM team that can lead the software outcome with Acceptance Tests using BDD. This can be achieved by hooking up Feature files with empty step definitions that fail.
QA can actually lead development by:
- Defining clear, testable behaviour before code is written.
- Creating visibility on what “done” looks like.
- Enabling Developers to implement functionality guided by the tests.
This approach elevates the QA Engineer from a gatekeeper to a co-pilot — shaping quality from day one. Acceptance tests that describe the expected behavior are written in a Feature File, often collaboratively during Backlog Refinement and continued as the task enters Sprint Planning.
With no glue code implemented yet, the initial test run will result in all scenarios failing. Cucumber then suggests the missing step definitions, providing auto-generated method stubs to guide implementation. This is where the step definition file comes to life.
By doing this early, the QA Engineer can seamlessly integrate acceptance tests into the development workflow — bringing visibility to incomplete functionality and test coverage, even outside of a formal CI/CD release pipeline.
First execution of Feature Files without any step definitions. Cucumber provides methods to glue scenarios with automation code as seen in the red labelled text in the terminal . Yellow underlined steps suggests no Step Definitions are yet in place.
Once the step definition file is created, every step corresponds to its relative method where the automation code will be located. Cucumber allows redirection towards the step, which makes it more easy for the developer to make the step pass.
Once the step definition file is created, Cucumber allows us to be redirected towards the step which will have the automation code to fulfil the step and make it pass.
Now that we’ve explored how Gherkin allows us to describe behavior in a clear, human-readable way — and how step definitions bridge those steps to actual automation — you might be wondering:
“What happens inside those step definition methods?”
In Part 2, we’ll roll up our sleeves and look under the hood.
🔍 We’ll explore:
- How to write real Java code inside step definitions
- How to handle test state between steps (e.g., using a shared
Context) and using dependency injection to achieve it. - Common practices like using a java utility class to handle all HTTP methods.
- Tips for keeping your step definitions clean, maintainable, and readable
Whether you’re a QA Engineer just getting into automation, or a developer curious about BDD in practice — Part 2 will give you the hands-on knowledge to connect the dots from Gherkin to working test code.
Stay tuned — it’s where Gherkin meets Java and the magic happens!

Leave a comment