
In Part 1, we explored the pivotal role of acceptance testing within the software development lifecycle. We emphasized the importance of starting acceptance testing early and discussed how Behavior-Driven Development (BDD) enables this by helping us define clear, executable acceptance criteria.
Along the way, we examined the structure and responsibilities within a Scrum team, highlighting how BDD fosters stronger collaboration among our Product Owners, Scrum Masters, and Developers.
We also introduced the Gherkin syntax through the use of Cucumber, showing how it allows us to bridge the gap between business requirements and technical implementation, ensuring that everyone — from stakeholders to developers — shares a common understanding of what needs to be built.
Now that we’ve laid the groundwork with BDD and acceptance testing, it’s time to move into the practical implementation. In this part, we’ll show how we automate acceptance tests and apply best practices to keep them maintainable and effective.
Recap
In Part 2, we will be going through the written code that makes up a Step Definition. But before diving into the Step Definition source code, let’s recap the jargon used in the first blog post, i.e. BDD, Gherkin and Cucumber
BDD (Behavior-Driven Development) – The Practice
- What it is: A software development approach that encourages collaboration between developers and business stakeholders.
- Goal: Define how software should behave through examples written in a shared, natural language format.
- Focus: Shift left, shared understanding, living documentation, and testable specifications.
Think of BDD as the philosophy or practice behind how SCRUM teams write tests and code collaboratively.
Gherkin – The Language
- What it is: A domain-specific language (DSL) used to write behavior scenarios in plain English.
- Syntax: Uses keywords like
Feature,Scenario,Given,When,Then,And,But. - Purpose: To describe system behavior in a human-readable way that non-technical stakeholders can understand and approve.
Gherkin is the format in which BDD scenarios are written.
Cucumber – The Tool
- What it is: A BDD testing framework that reads Gherkin files and connects them to executable code (step definitions).
- Languages supported: Java, JavaScript, Ruby, Kotlin, etc.
- Role: Bridges Gherkin scenarios to the actual implementation code that performs the test actions.
Cucumber is the engine that runs Gherkin scenarios and matches them to your code.
Fast Reference Cheat Sheet
| Concept | Type | Role |
|---|---|---|
| BDD | Methodology/ Practice | Collaborative approach to defining behaviour |
| Gherkin | Language | Syntax for writing test scenarios in plain language |
| Cucumber | Tool/Framework | Executes Gherkin specs using step definitions |
Inside the Step Definitions
At the end of the first blog post, we wrapped up by covering the “glue” between feature files and step definitions. When that glue is missing, meaning the step definitions are either empty or undefined, the tests fail. And that’s exactly what we want in the pipeline.
These failures act as signals, nudging the Scrum team to implement the missing functionality. As those steps are made to pass, they bring the specification to life, or as Product Owners often refer to it, the Acceptance Criteria. That’s why we call them Acceptance Tests.
Lets take a deeper dive into the Step Definitions by referencing the first Scenario (Acceptance Test) in the Feature File.
N.B. The Given step below was attached to the Scenario itself for better clarity and explanation. This step is under the Background Gherkin tag, and as explained in Part 1 (The Feature File section), it executes for all Scenarios.
  @functional
  Scenario: GET Booking list
    Given a bookings list is available
    When the user retrieves booking list
    Then the user should have a list of all bookings
Every step has a corresponding method in the step definitions file – BookingStepsDefinitions.java.
Opening the steps definition file, one can notice that within each method, there is a set of concepts being used. Let’s break down these concepts first before deep diving into the method syntax.
Cucumber Annotations:
@Given,@When, and@Thenmap Gherkin test steps in the Booking.Feature file to Java methods.Scenario Context – The Context object: Used to store data (It is shared “memory” between steps).
Booking Actions: Holds all HTTP Calls and logic towards the CRUD operations towards Booking.
Deserialization: Converting JSON responses from Booking API Calls, into Plain Old Java Object (POJO)- A Java class representing the booking data structure within the JSON response.
Let’s perform a deeper analysis and evolve on the concepts discussed above, referencing the methods defined in the
BookingStepsDefinitions.javafile. We will map the methods directly to their corresponding Cucumber annotations and expand on the remaining concepts from that foundation.Cucumber Annotations
@Given– Setup
@Given("a bookings list is available")The purpose of a Given step is to setup data before the main test action happens.
@Given("a bookings list is available")
public void a_booking_list_is_available() {
   try {
         context.set("bookingList", bookingActions.getBookings());
       } catch (IOException e) {
           throw new RuntimeException("Failed to fetch bookings list: " + e.getMessage(), e);
    }
}
Syntax explanation:
- Calls
bookingActions.getBookings()to fetch the data. It is an automated API Call towards the application under test. - Stores the result in the context under the key
"bookingList".
@When – Action
@When("the user retrieves booking list")
The When step is where some action is happening. In our example, the logic inside the When step happened to be the same (calling the same API – http://localhost:8080/bookings) as the Given step. This would not be the same if the user is trying to delete, add or update the booking list.
@When("the user retrieves booking list")
public void the_user_retrieves_booking_list() {
    try {
         context.set("bookingList", bookingActions.getBookings());
        } catch (IOException e) {
            throw new RuntimeException("Unable to retrieve booking
            list: " + e.getMessage(), e);
    }
}
Syntax explanation:
- Calls
bookingActions.getBookings()to fetch the data. It is an automated API Call towards the application under test. Same as the Given step in this particular case. - Stores the result in the context under the key
"bookingList".
@Then – Assertion
@Then("the user should have a list of all bookings")
The Assertion step will determine weather the test passed or failed. In this case it ensures that the retrieved data is complete and usable. This will close the test execution, and label an Acceptance test as a Success or a Failure.
@Then("the user should have a list of all bookings")
public void the_user_should_have_a_list_of_all_bookings() {
    try {
         NestedBookingPojo bookings = context.get("bookingList", NestedBookingPojo.class);
         Assertions.assertNotNull(bookings, "Booking list object is null");
         Assertions.assertNotNull(bookings.get_embedded(), "Embedded section is null");
         Assertions.assertNotNull(bookings.get_embedded().getBookingList(), "Booking list is
         null");
         Assertions.assertFalse(bookings.get_embedded().getBookingList().isEmpty(), "Booking
         list is empty");
     } catch (Exception e) {
         throw new RuntimeException("Failed to validate booking list: " + e.getMessage(), e);
     }
}
Syntax explanation:
- Retrieves the result in the context under the key
"bookingList". - Performs a series of Assertions on retrieved data, specifically the below:
- Check that
bookingsis not null by ensuring that thebookingListobject was actually retrieved. - Check that
bookings.get_embedded()is not null by verifying that the Embedded.java inside the bookings exists. (POJO – we will get to this later). - Check that
bookings.get_embedded().getBookingList()is not null, by ensuring that the list of bookings itself exists in the Embedded.java class file. - Check that the booking list is not empty by validating that there is at least one booking in the list.
- Check that
Scenario Context
Inside each of the steps we outlined earlier, we consistently reference our Context.java class.
Context usage in the @Given and @When Step:
context.set("bookingList", bookingActions.getBookings());
Context usage in the @Then Step
NestedBookingPojo bookings = context.get("bookingList", NestedBookingPojo.class);
This class acts as a lightweight, reusable storage solution, allowing us to easily share data between step definitions in our Cucumber tests. A meaningful name is given to reference the stored data - bookingList.
During our @Given steps, we use the context to store specific data, which we retrieve at the end of the step to prepare for the next actions. In our @When and @Then steps, we immediately access the context at the beginning to fetch the data we need for execution and validation.
Despite its simplicity, our Context class is incredibly powerful. It relies on just a single variable and three methods — a minimalist design that enables flexibility, readability, and reusability in our tests.
Let’s take a closer look at the purpose of each part.
| Syntax | Purpose |
|---|---|
private final Map<String, Object> data = new HashMap<>(); | A private HashMap that stores key-value pairs (key = String, value = any Object). |
public void set(String key, Object value) | Stores (sets) a value into the data map using a given key. |
public <T> T get(String key, Class<T> clazz) | Retrieves a value by key and casts it to a specific type safely. |
public boolean contains(String key) | Checks if a key already exists in the data map. |
Generics in Context.java class
Our Context.java class is designed as an instance object. This means that different scenarios, tests, or threads can each have their own separate Context, completely isolated from one another.
By avoiding static fields, we eliminate the risk of global pollution and race conditions, making our tests far more reliable and predictable. It also becomes much easier for us to inject the context into our tests or BDD steps, such as those in our Cucumber StepDefinitions, keeping everything clean, modular, and maintainable.
By using generics, we gain several key advantages that directly strengthen our codebase. We achieve better type safety, allowing us to catch errors early during compile time instead of risking failures at runtime.
We eliminate the need for explicit casting, leading to cleaner and more maintainable code. If we are not using generics, the context usage in the @Then step would look like this:
NestedBookingPojo bookings = (NestedBookingPojo) context.get("bookingList");
A note about Dependency Injection
In our test automation architecture, the Context.java class is injected into the BookingStepDefinition.java class. This design choice is intentional and offers several key benefits:
1. Adheres to Best Practices
This pattern aligns with best practices for creating clean, maintainable, and scalable test automation architectures. By following these principles, we ensure our tests are robust and easier to maintain over time.
2. Ensures Proper Initialization
By injecting the Context into the constructor of BookingStepDefinitions class, we enforce that a valid Context must exist for the object to be created. This guarantees that the class is always properly initialized, reducing the risk of potential errors during execution.
3. Clarifies Dependencies
The constructor injection makes dependencies explicit. Anyone reviewing the code immediately understands that the BookingStepDefinitions class requires a Context to function properly, improving readability and maintainability.
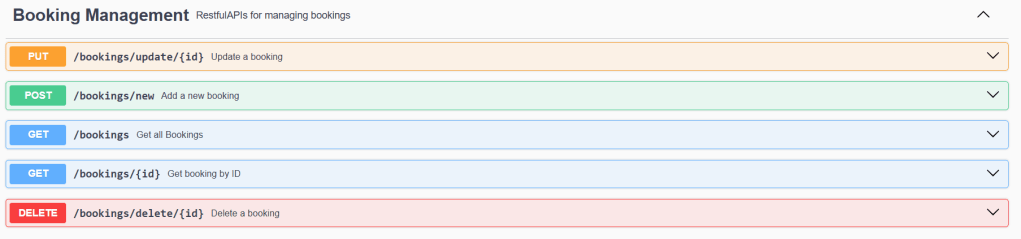
Booking Actions
The BookingActions.java class encapsulates all Booking-related API interaction logic. It orchestrates the execution of CRUD operations (Create, Read, Update, Delete) against the target system — the Booking RESTful API. This class abstracts the direct HTTP communications and response handling, promoting cleaner step definitions and centralized API management.
The following provides a detailed breakdown of the java methods implemented and the specific API endpoints invoked during testing, specifically in the BookingActins.java class
getBookings()
- HTTP Method: GET
- Endpoint:
http://localhost:8080/bookings - Description: Retrieves the complete list of all bookings available in the system.
getBookingById(int id)
- HTTP Method: GET
- Endpoint:
http://localhost:8080/bookings/{id} - Description: Fetches the booking details corresponding to the specified booking ID.
addBooking(JSONObject json)
- HTTP Method: POST
- Endpoint:
http://localhost:8080/bookings/new - Description: Creates a new booking using the provided JSON payload.
updateBookingById(int id, JSONObject json)
- HTTP Method: PUT
- Endpoint:
http://localhost:8080/bookings/update/{id} - Description: Updates an existing booking with the new data supplied in the JSON payload.
deleteBookingById(int id)
- HTTP Method: DELETE
- Endpoint:
http://localhost:8080/bookings/{id} - Description: Deletes the booking record associated with the given booking ID.
Before we introduced the API automation, we tested all the API endpoints manually, which was made possible by integrating Swagger within the application under test. While the application is running locally, we can access its live API documentation for real-time testing through a browser using the link: http://localhost:8080/swagger-ui/index.html#/.
HTTP Methods Utility Class
Within the BookingActions.java file, we consistently rely on the HTTPHelper.java class to perform our HTTP operations. Since HTTP method calls are a standard part of our interactions with the application under test, we decided to extract them into a dedicated utility class — hence the package name we placed it in: io.qualitymatters.bdd.utilities.
All methods within this utility class are static, which slightly contradicts an earlier principle we discussed regarding the Scenario Context. So why did we opt for a static approach?
Primarily, it’s because using static methods for utilities is a common practice in Java, especially when the methods are purely functional. In our case, the HTTPHelper.java class serves exactly that purpose. Beyond convention, this approach offers simplicity and speed: we can call the methods directly without the need to instantiate an object first.
However, this design choice is not without risks. The most significant challenge would arise if the application under test introduces authentication. Static methods cannot hold state, meaning they lack the ability to store an authentication token across requests. As a result, we would be forced to pass the token manually with every call — an error-prone and cumbersome process.
Should authentication become a requirement, we would need to refactor HTTPHelper.java, moving away from static methods toward a more flexible, instance-based design that can securely manage an authentication state.
Deserialization
When working with HTTP APIs, we have to inevitably deal with JSON responses that represent structured data. To interact with this data effectively in Java, we rely on deserialization — the process of converting raw JSON into usable Java objects.
We define a set of POJO (Plain Old Java Object) classes that mirror the structure of the JSON response. These classes allow us to map each field in the JSON to a corresponding Java field, enabling type-safe access and cleaner code. By deserializing responses directly into these POJOs, we avoid manual parsing and reduce the chances of runtime errors.
This approach not only improves readability and maintainability, but also integrates seamlessly with dependencies like Jackson, allowing us to focus on business logic instead of data handling.
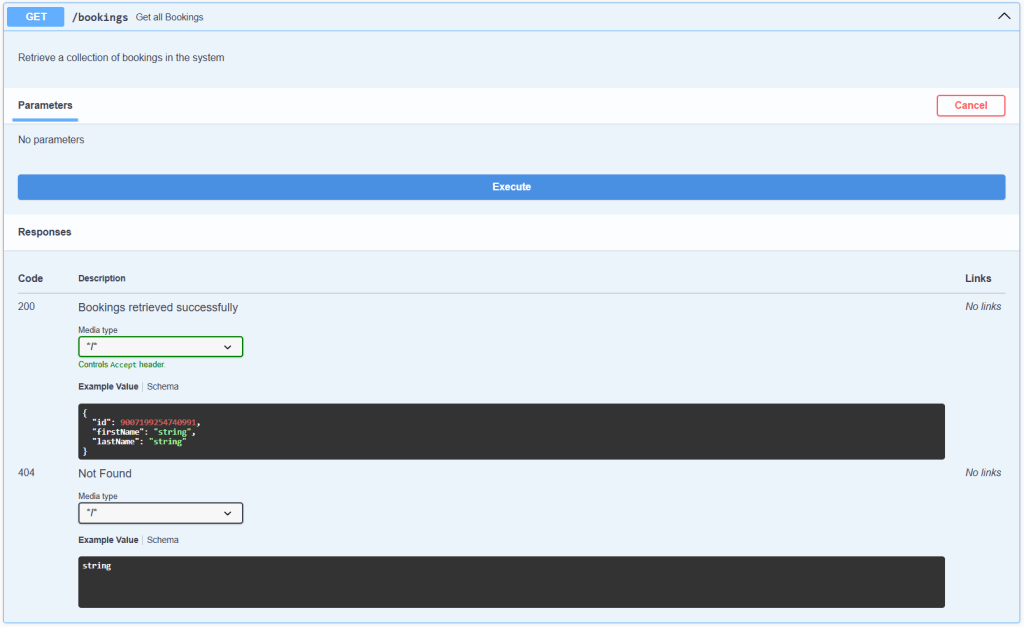
Lets keep on referencing the same example, and call the endpoint which gets us all bookings in the system:
http://localhost:8080/bookings
The below is the response:
JSON Response from GET Request
{
  "_embedded": {
    "bookingList": [
      {
        "id": 1,
        "firstName": "Mario",
        "lastName": "Galea",
        "_links": {
          "selfLink": {
            "href": "http://localhost:8080/bookings/1"
          },
          "bookingsLink": {
            "href": "http://localhost:8080/bookings"
          }
        }
      },
      {
        "id": 2,
        "firstName": "Vincent",
        "lastName": "Vega",
        "_links": {
          "selfLink": {
            "href": "http://localhost:8080/bookings/2"
          },
          "bookingsLink": {
            "href": "http://localhost:8080/bookings"
          }
        }
      },
      {
        "id": 3,
        "firstName": "Jackie",
        "lastName": "Brown",
        "_links": {
          "selfLink": {
            "href": "http://localhost:8080/bookings/3"
          },
          "bookingsLink": {
            "href": "http://localhost:8080/bookings"
          }
        }
      }
    ]
  },
  "_links": {
    "bookingsLink": {
      "href": "http://localhost:8080/bookings"
    }
  }
}
When we work with Deserialization in our test, we often face a key decision: should we deserialize the JSON response into POJOs, or just assert the response directly as raw JSON?
Let’s be honest — without deserialization, asserting API responses quickly turns into a nightmare. It becomes hard to maintain, fragile, and definitely not scalable. What might feel fast in the beginning ends up creating hidden costs over time.
Some developers argue that hardcoding JSON into the codebase allows for rapid prototyping. While that might have been true once, the reality today is that we have better tools at our disposal. Tools that allow us to generate POJOs instantly from a sample JSON — making rapid development even faster and more maintainable.
For example, we recently used json2csharp (though there are many such tools) to generate model classes. After pasting in our API response, we instantly received a list of ready-to-use POJOs that we integrated into our Java package io.qualitymatters.bdd.booking.pojo.
Here’s what was generated:
NestedBookingPojo.java(Root object)Embedded.javaBooking.javaBookingsLink.javaLinks.javaSelfLink.java
This class structure directly reflects the hierarchical nesting of the original JSON response — giving us a strongly typed model that’s easy to use across our Cucumber steps, API clients, and validations.
Development Flow
Now that we covered all sections, lets take a look at the development flow in order to hit all the above techniques.
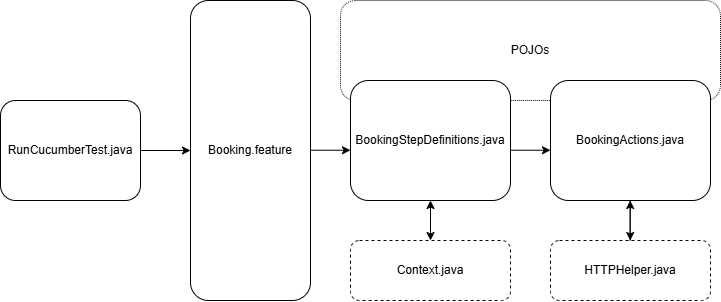
We begin our acceptance testing process by writing our test scenarios in the Booking.feature file using Gherkin syntax. This file captures the behavior we expect from the system in a human-readable format.
To execute these scenarios, we use RunCucumberTest.java, which serves as our Cucumber test runner. It picks up the Booking.feature file and initiates the corresponding step definitions.
Our BookingStepDefinitions.java file maps the steps from the feature file to executable code. Here, we define what each Gherkin step actually does in terms of test logic. This file acts as the glue between the feature and the actual application logic.
Within the step definitions, we rely on Context.java to manage and share test state across different steps. This ensures we maintain consistency and reusability of data throughout a scenario.
We delegate system interactions and API calls to BookingActions.java, where we encapsulate the logic for performing operations like creating or retrieving a booking. These actions are abstracted away from the step definitions for better modularity.
To perform HTTP requests or other low-level operations, BookingActions.java interacts with HTTPHelper.java, which provides utilities for making network calls.
We also utilize POJOs (Plain Old Java Objects) across BookingStepDefinitions.java and BookingActions.java to model the request and response data structures, keeping our test code type-safe and aligned with the domain.
Conclusion: Reporting Builds Trust
As a team committed to building quality software, we know that writing robust acceptance tests is just one part of the equation. The other often overlooked piece is how we report the results of those tests. That’s where our RunCucumberTest.java configuration becomes more than just a test runner; it’s the heart of how we communicate outcomes, progress, and ultimately, quality.
When we configure our RunCucumberTest.java, we don’t just think about executing feature files. We also set up powerful reporting plugins like pretty, json, html, or junit, to generate clear, readable, and shareable test reports. These reports aren’t just for us as QA engineers, they’re for the whole team.
@ConfigurationParameter(key = PLUGIN_PROPERTY_NAME, value = "html:target/cucumber-reports/Cucumber.html")As highlighted here reporting isn’t just a technical activity, it’s a trust-building one. Transparent, timely, and accurate test results foster trust across the team. When everyone can see what passed, what failed, and why, we’re able to make faster, more confident decisions about our releases. Whether it’s a regression run overnight or a quick smoke test during a feature branch merge, we can trace back to the results quickly, and more importantly, so can anyone else on the team.
By investing in reporting at the configuration level, we’ve turned test execution into a conversation starter, not a bottleneck. We’re not just running tests, we’re telling the story of our software’s health, one scenario at a time.


Leave a comment